If you don’t find what you are looking for below feel free to Contact Us through our contact us page.
Click the + next to each product for instructions (diagram shown below instructions for each item)
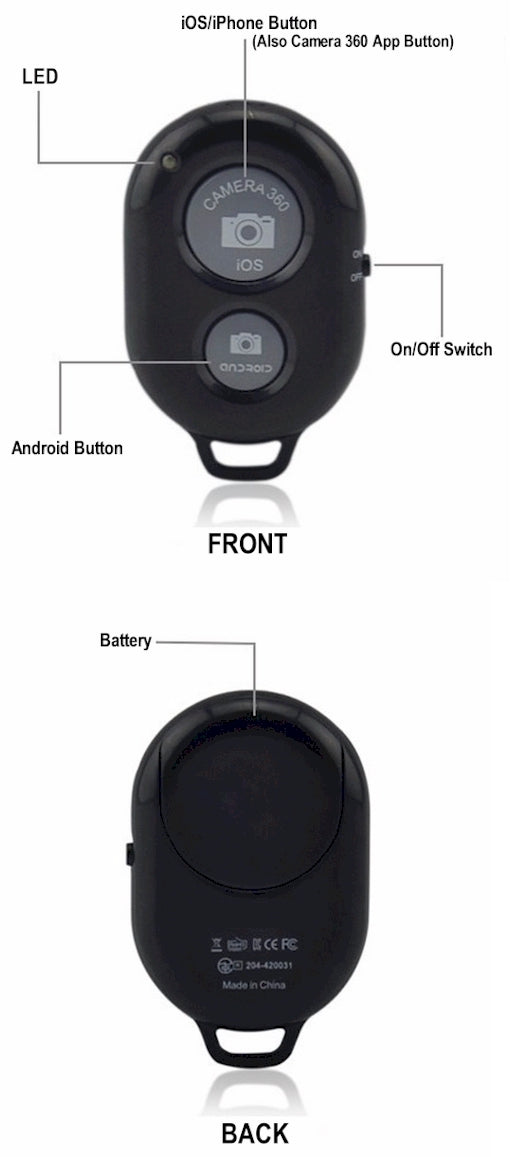
+ Bluetooth Remote
Instructions to setup and use:
1. Insert battery and turn the switch to "ON" found on the side of the Bluetooth remote (battery may already be installed).2. Turn Bluetooth "ON" in your device (Go to Settings > Bluetooth > On)
3. Then, while still in your Bluetooth screen on your device, Choose "AB Shutter3" in the devices that come up listed to pair it.
4. It will say "Connected" next to Shutter in the devices list after it is paired.
5. Open your built-in camera app on your device.
6. Push the appropriate button on the Bluetooth remote to take a picture or to start/stop video (One is marked for iPhone/Camera 360 App and the other for Android). If you hold down the button for a couple of seconds while in photo on your device, the remote will be in burst mode and take several pictures.
PLEASE NOTE: For newer android devices, you will need to download "A Better Camera" app from the Google Play store and go to the video function in that app to use the start/stop video function of the remote.
Troubleshooting:
If your remote has stopped working, but the light is still coming on:
- Go into your Bluetooth Devices in your phone/device and find the AB Shutter 3 in the list.
- Click the blue circle "i" that is next to AB Shutter 3.
- Choose "Forget this Device"
- This will reset your connection. You will need to repeat the initial steps 1-6 in the instructions above to setup and use the Bluetooth remote.
Light Patterns of Remote:
Blinking
- Trying to connect to your device.
- When you take a picture, it will come on while pressing the button on the remote. It should also briefly come on when you turn the remote switch to the "ON" position.
- Remote in "OFF" position, or not currently in use while turned "ON".
- Remote in "ON" position but not functioning - If the light does not come on, but you have been using it within a few minutes, the remote may be in sleep mode, and you may need to press the Camera 360/iOS or Android button twice to turn it back on. If that does not work, turn the remote "OFF" and then back "ON". If the light does not come on at all when you are trying to use the remote, and you have followed the troubleshooting instructions, you may need to replace the battery.
Video Function for Newer Android Devices:
If you are having trouble getting video to start or stop on your Android device, but can take pictures fine, you will need to download "A Better Camera" app from the Google Play store and go to the video function in that app to use the start/stop video function of the remote.
Button Function for Google Pixel Devices:
If you are having trouble getting the Android button to work for your Google Pixel, please try the iOS/Camera 360 Button Instead.
+ Cell Phone Car Mounts
Installation Instructions for using the DaVoice Smartphone Car Mount
1. Loosen both vertical and horizontal adjusting screws to allow easy installation of the Smartphone adapter.2. Connect the Smartphone adapter to the suction cup mount using the standard 1/4” screw.
3. Install the suction cup mount to a smooth, CLEAN surface and press the suction cup tab down. (Towards the mounting surface)
4. Adjust your phone position to the desired location and tighten all screws securely, including the 1/4” adapter screw. (Numbers 1 and 2 in diagram)

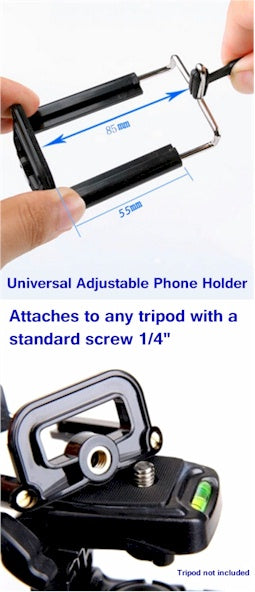
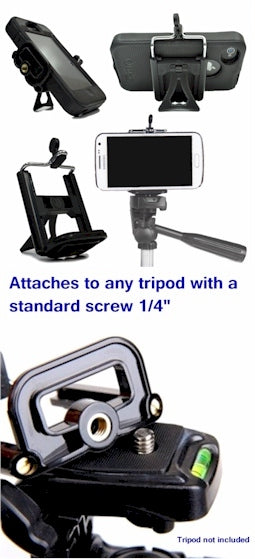
+ Cell Phone / iPad Tripod Adapter
The actual standard screw itself comes with your tripod (all tripods come with them and it should be attached to your tripod quick release plate/head). We have included a screw as a bonus to our cell phone tripod adapters (with a single adapter purchase). Remove the screw before attaching your adapter to the tripod.
To attach the cell phone tripod adapter to a tripod, there should be a release lever/button on the tripod itself that will allow you to remove the tripod head that has the screw. Once you do this, tighten the screw on to the cell phone tripod adapter threads.
Reattach the tripod head to the tripod with the cell phone adapter now attached by the screw. The adapter is spring-loaded, so you can pull it open some (by pulling the rubber piece on top) to insert your cell phone. Release the rubber grip piece. The adapter will put enough pressure on the phone from the spring action to hold the cell phone in place on the tripod.

+ DaVoice Pet Communication System
You can download the DaVoice Pet Communication Instructions and Training Guide here:
Click here to download the Instructions and Training Guide
Visit our DaVoice YouTube Channel for Training Videos. Links to Videos Below:
How to Setup the DaVoice Dog Talking Button Board and make Great Recordings
DaVoice Dog Button Training - Training your dog to talk with buttons (how to press a button)
DaVoice Dog Button Training - Dog Potty Training Button
+ DaVoice Individual Dog Buttons for Communication
You can download the DaVoice Dog Button Training Guide here:
Click here to download the Training Guide
Visit our DaVoice YouTube Channel for Training Videos. Links to Videos Below:
How to Setup the DaVoice Dog Talking Button Board and make Great Recordings
DaVoice Dog Button Training - Training your dog to talk with buttons (how to press a button)
DaVoice Dog Button Training - Dog Potty Training Button
+ Desk Stand Tripod Adapter
The actual standard screw itself comes with your tripod (all tripods come with them and it should be attached to your tripod quick release plate/head).
To attach the cell phone desk stand tripod adapter to a tripod, there should be a release lever/button on the tripod itself that will allow you to remove the tripod head that has the screw. Once you do this, tighten the screw on to the cell phone tripod adapter threads.
Reattach the tripod head to the tripod with the cell phone adapter now attached by the screw. The adapter is spring-loaded, so you can pull it open some (by pulling the rubber piece on top) to insert your cell phone. Release the rubber grip piece. The adapter will put enough pressure on the phone from the spring action to hold the cell phone in place on the tripod.
You can also use this item as a desk stand. You can turn it horizontally or vertically to hold you phone in portrait or landscape on your desk or table, but not when attached to a tripod.

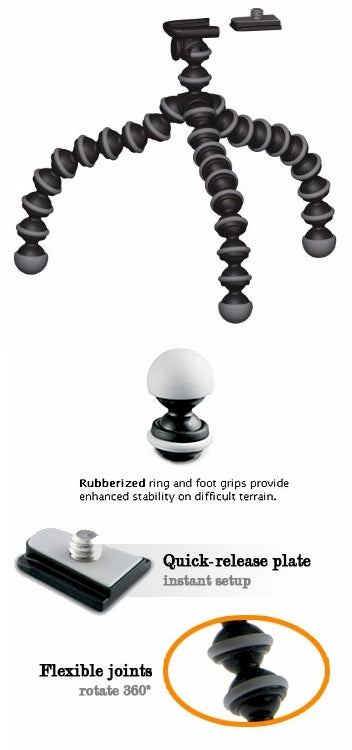
+ Flexible Tripod
To attach the cell phone tripod adapter to the flexible tripod, push the release button on the tripod itself that will allow you to remove the tripod head that has the screw. Once you do this, tighten the screw on to the cell phone tripod adapter threads.
Reattach the tripod head to the tripod with the cell phone adapter now attached by the screw. The adapter is spring-loaded, so you can pull it open some (by pulling the rubber piece on top) to insert your cell phone. Release the rubber grip piece. The adapter will put enough pressure on the phone from the spring action to hold the cell phone in place on the tripod.
You can adjust the legs where it will stand on a flat surface, or you can bend the flexible tripod to the shape desired to help it be the most stable in the environment you are going the be using it in. You can wrap the legs around a tree limb, or fence, etc. You may need to adjust/bend the legs around to make it more stable. Play around with it to see what works best for you.
TIP: If you need to use the tripod as an upright tripod and have a heavier cell phone, it makes it more stable if you will fold each leg into an upward circle that meets under the adapter. Then you can adjust the top center of the flexible tripod as well to have better balance.

+ Microphone
Plug the microphone into a 3.5mm 4 pin jack and record your voice with a compatible app from the Apple Store, Google Play Store, Windows Store (OR a built-in app on your device) and use it to make your recording.
TO LISTEN TO YOUR RECORDING, FIRST UNPLUG the MICROPHONE from the jack, (leaving the microphone plugged in will cancel out the playback sound) THEN YOU CAN PLAY THE RECORDING.
TROUBLESHOOTING:
- Unplug the microphone, and then re-plug to test it again. If occasionally the mic does not work, please check that you fully plugged it into the jack (some phone cases prevent this).
- Try to use the microphone on another smartphone or devices to test compatibility.
- If you are having trouble finding a plug-in jack on your newer phone, use the "lightning to 3.5mm adapter cable" that came with your iPhone 7 / 7 Plus / iPhone 8 / 8 Plus / iPhone X (or similar cable for other brands) to connect the microphone to newer phones that do not have a headphone jack.
- If you are using a LifeProof case or similar, you may need the extension cable that came with your case in order to plug the microphone all the way in, or remove the phone from the protective case to have full access to your jack.
- IMPORTANT: Please unplug the microphone before playing back your recording.
The main function of the DaVoice microphone is to record sound, it is not an amplifier or speaker.
+ Mini Aluminum Tripod
Mini Tripod Instructions
Attach cell phone tripod adapter to the tripod screw by twisting on threads until tight. To expand the tripod, pull on the bottom of the legs. Adjust ball head of tripod with side tab. Adjust into desired position.
Rotate Adapter Instructions
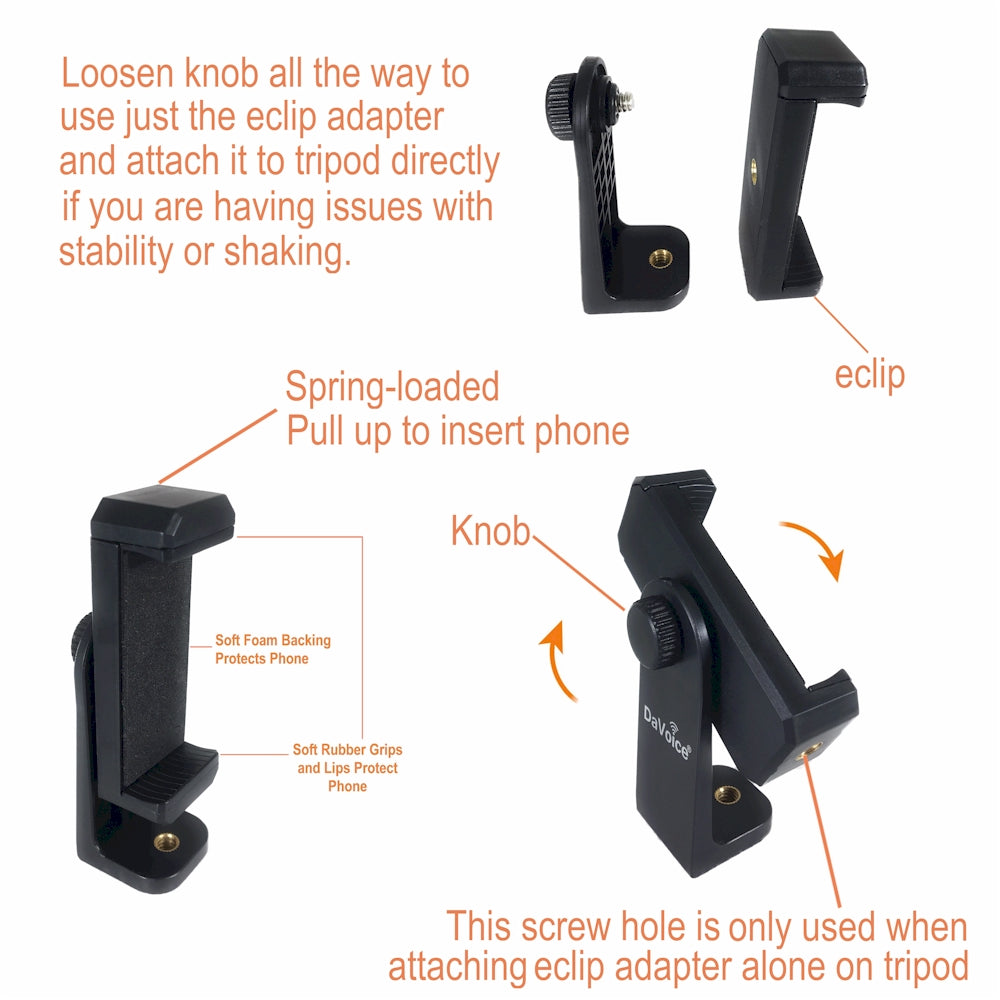
To rotate the clip, loosen the knob on the back of the adapter, and then tighten the knob once you have it in the horizontal or vertical position. Insert your phone securely into the adapter (it is spring loaded).
See Bluetooth Remote Instructions for help with the Bluetooth Remote.
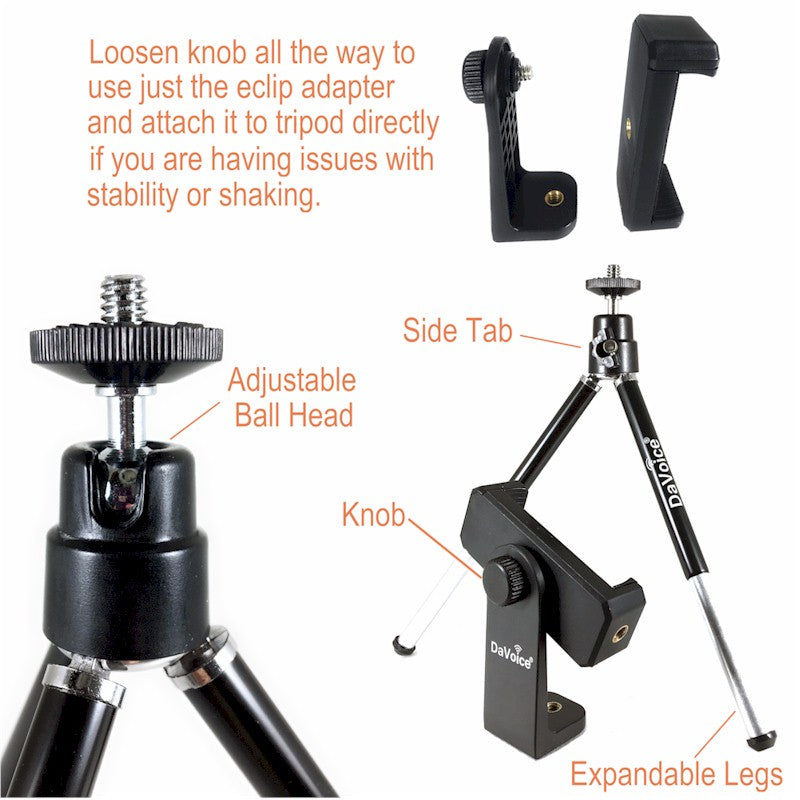
+ Rotating Phone Tripod Adapter
To rotate the clip, loosen the knob on the back of the adapter, and then tighten the knob once you have it in the horizontal or vertical position. Insert your phone securely into the adapter (it is spring loaded). Note: If you are having issues with stability or shaking, please loosen the knob all the way until you have two separate pieces. Then attach the eclip portion only to your tripod. You can still use your phone in the horizontal or vertical position by adjusting the tripod head on your tripod to a 90 degree angle by loosening and tightening the tripod head knob.
+ Selfie Stick
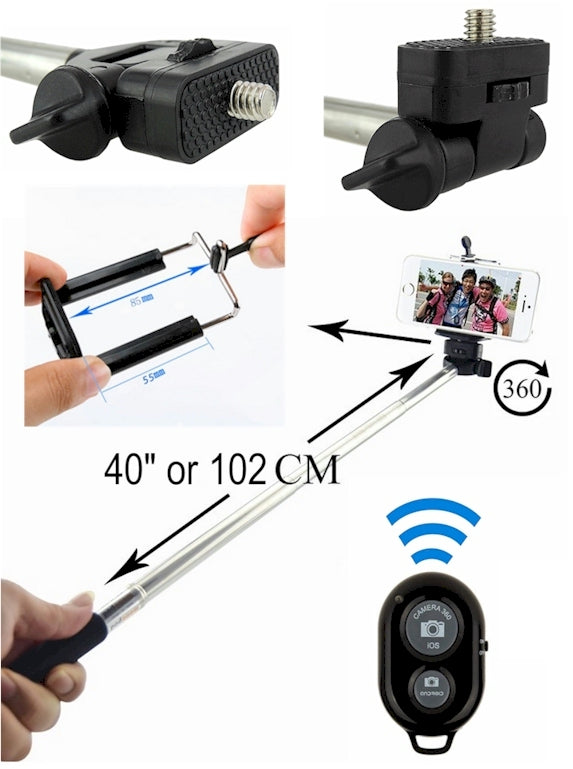
The selfie sticks are telescopic so you can take a selfie further away from you. To do this, pull outward on the metal part of the stick. If the weight of your phone is too heavy, do not extend the metal telescope of the pole out as far, as this will make it more stable for heavier phones.
To attach the cell phone tripod adapter to the selfie stick, you screw it on the threads of the adapter with the wheel right below the screw on the selfie stick. Tighten it up before putting your phone in the adapter.
The adapter is spring-loaded, so you can pull it open some (by pulling the rubber piece on top) to insert your cell phone. Release the rubber grip piece. The adapter will put enough pressure on the phone from the spring action to hold the cell phone in place on the selfie stick.
The knob on the side of the selfie stick head is used to tighten up the angle you would like to have the phone adjusted to for taking the selfies.
Turn the switch on the end of the Selfie Stick to ON (light should blink if charged). If light does not come on, then please charge selfie stick with included cable.
Turn Bluetooth ON in your device (Go to Settings > Bluetooth > On.
Wait for a few seconds... Then while still in your Bluetooth screen on your device, choose "Z07-5" in the devices that come up listed to pair.
Wait for a few seconds... It will say "Connected" next to Z07-5 in the devices list after it is paired.
Open Photo/Video program on your smart phone and press the button on the Selfie Stick handle to take picture.
For Bluetooth troubleshooting, see Bluetooth Remote instructions above.

+ Screen Protector

